Lua scripts for SciTE =====================
First draft: 2025-04-23
Published:   2025-05-05
Table of contents:
Showing a couple of convenience functions I added to my favorite text editor.
This is part of a series of posts, the project intro article can be found here.
Motivation
In the Scintilla Text Editor, a very large portion of the program's behavior is controlled through properties. Check out the online documentation for a complete list, even if just to see how comprehensive the system is. Values are set and can be overwritten with the various layers of `.properties` files. For most of the properties, you don't even have to restart the program after changes. This provides a very nice environment to experiment with the setup, but the configuration is still static in the sense that most of the properties are accessible only through the files, and cannot be set quickly via graphical menus.
I have found that there are a couple of settings I keep adjusting pretty often, so I have leveraged the integrated Lua execution facilities inside SciTE to create a couple of scripts to adjust these on the fly. I invite you to join me, as I record for future-me how to do this next time.
Preparations
Before we begin, I would like to bring to your attention the following written resources that have helped me a great deal getting to know Lua scripting in SciTE:
As it is mentioned in one of the articles above, probably the first thing to set up is one-click script execution for quick prototyping.
Through "Options" > "Open User Options File" open the `.SciTEUser.properties` file (or you can use Local as well if you prefer), and add the following:
> command.name.0.*=Run as Lua Extension
> command.subsystem.0.*=3
> command.0.*=dostring dostring(editor:GetText())
> command.mode.0.*=savebefore:no
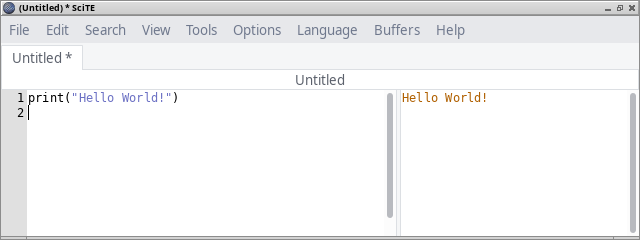
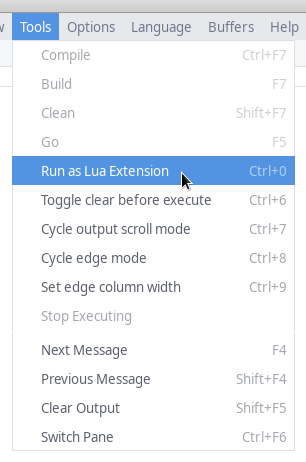
With these we define a new command item in the Tools menu, numbered zero (thus accessible with the shortcut Ctrl+0 from now on). It will use the Lua subsystem to execute the contents of the main editor panel as it is, as a script, without saving the contents beforehand.
You can try it by opening a new editor tab and typing simply something like:
> print("Hello World!")
When you invoke the new command through Tools or hit Ctrl+0, the message should appear in your output pane.
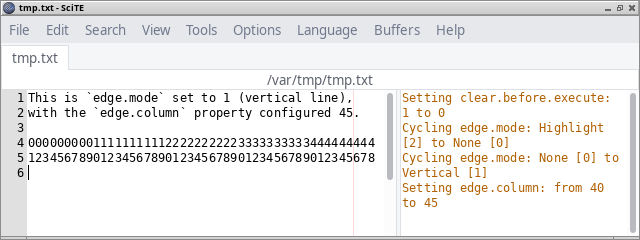
Cycling edge mode
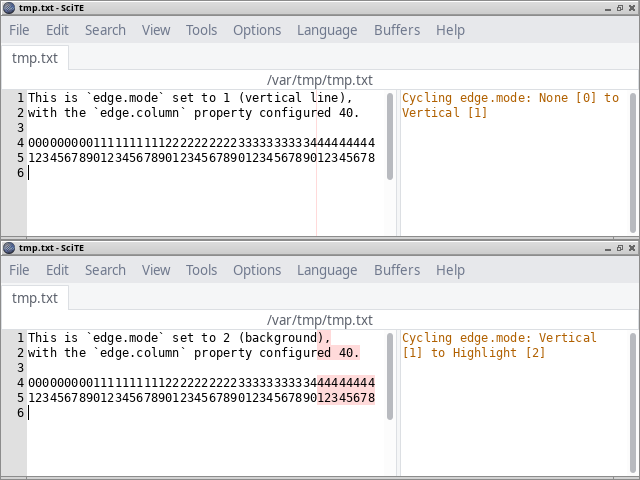
The `edge.mode` property sets how the editor indicates if the contents of a line is too long, i.e. it has more characters than the number set in `edge.column`.
For anyone wondering how this is even a thing and why don't we just use automatic line wrapping, I must say that I have never liked to use it for programming, as usually there are subtle semantics involved in determining where and how to split a long line, to keep readability at maximum.
The possible values of the property are the following.
-
0: does not indicate long lines
This is the default behavior, for those situations when you just do not care about the length, and do not want to be bothered by any visual indication. -
1: vertical line
This is the usual indicator that can be found in many editors, which is great when you want to fit strictly into some width and would like to see on every line how you are doing. Naturally, this only works well with monospaced fonts. -
2: changes the background of chars beyond
This is a nice in-between compromise that I usually use by default, it does not show anything until the line is too long. Color of the background highlight can be set as well of course (see the `edge.colour` property), so we have further choice to use something modest, or if we want a more prominent indication.
This property might be a good example where the file extension (hence lexer) based distinction could come in handy for most people. I wanted something more simple though, so that I can just cycle through the options on the occasion when I want the definite vertical line, or would like to get rid of any indication.
> function cycle_edge_mode()
>     local mode0 = math.floor(props['edge.mode'])
>     local mode1 = mode0 + 1
>     if mode1 > 2 then
>         mode1 = 0
>     end
>     props['edge.mode'] = mode1
>
>     names = {"None", "Vertical", "Highlight"}
>     print("Cycling edge.mode: "
>         .. names[mode0+1]
>         .. " ["
>         .. mode0
>         .. "] to "
>         .. names[mode1+1]
>         .. " ["
>         .. mode1
>         .. "]"
>     )
> end
Setting edge column width
The `edge.column` property controls the width threshold for `edge.mode` indication.
Often I work with files that I like to keep under 80 wide to behave well in terminals. For a long time that was kind of a standard in everyday programming as I understand, but more and more people argue for a wider default. I just hope this is something our visually impaired friends will be able cope with. For the time being, I am keeping my default at 100, in accordance with the Rust Style Guide.
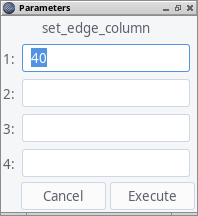
In order to be able to set the property to a value given by the user, we can use the "View" > "Parameters" window, which is for exactly this type of situation, to set custom parameters to internal functions. The four parameter values can be accessed using `props[1]` to `props[4]` in our scripts.
> function set_edge_column()
> local p1 = tonumber(props[1])
> if p1 == nil then
> print("Error: invalid props[1], set a numeric value at View > Parameters.")
> else
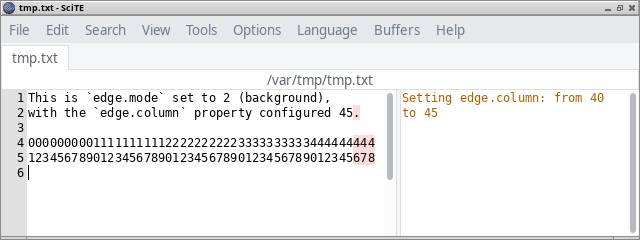
> local col0 = props["edge.column"]
> props["edge.column"] = props[1]
> print("Setting edge.column: from "..col0.." to "..props[1])
> end
> end
In order to automatically open the dialog every time we run our script as a command, we will have to put an asterisk before specifying the function name in the command property (like `*set_edge_column`). You can find an example of this later in the article, around `command.9` in the last code block.
Clear before execute
Our next set of functions control the behavior of the output pane. The first one is pretty straight-forward: should the program empty the contents of the output before executing a command? We can control this via the `clear.before.execute` property. I usually keep it at 1 (true = clear) for convenience, but there can be situations when this is not desirable, namely when we want to compare two or more consecutive runs of some kind.
> function toggle_clear_before_execute()
>     local mode0 = math.floor(props['clear.before.execute'])
>     local mode1
>     if mode0 == 0 then
>         mode1 = 1
>     else
>         mode1 = 0
>     end
>     props['clear.before.execute'] = mode1
>     print("Setting clear.before.execute: "..mode0.." to "..mode1)
> end
Please note that in the current form the script behavior might be somewhat surprising. With the property set to 1 (clear), you have to anticipate one step ahead if you would possibly not want to clear your output, because by merely executing this very script, your output will inherently be emptied one last time.
Cycling output scroll mode
Our last script for today deals with the scroll behavior at the output pane. The `output.scroll` property has the following possible values:
- 0: stop autoscroll
- 1: scroll and return
- 2: scroll to bottom
My default is 2 naturally, but with Rust sometimes I find myself tweaking this, as the compiler tends to put more interesting errors up top, yet also often a bunch of warnings come first...
> function cycle_output_scroll()
>     local mode0 = math.floor(props['output.scroll'])
>     local mode1 = mode0 + 1
>     if mode1 > 2 then
>         mode1 = 0
>     end
>     props['output.scroll'] = mode1
>
>     names = {"None", "Return", "Bottom"}
>     print("Cycling output.scroll: "
>         .. names[mode0+1]
>         .. " ["
>         .. mode0
>         .. "] to "
>         .. names[mode1+1]
>         .. " ["
>         .. mode1
>         .. "]"
>     )
> end
Putting it all together
With our script(s) ready and tested, we can make them persist in the following way. For my four new scripts above, I added the following lines to `.SciTEUser.properties`:
> ext.lua.startup.script=$(SciteUserHome)/.config/SciTE/SciTE_functions.lua
>
> command.name.6.*=Toggle clear before execute
> command.subsystem.5.*=3
> command.6.*=toggle_clear_before_execute
> command.mode.6.*=savebefore:no
>
> command.name.7.*=Cycle output scroll mode
> command.subsystem.7.*=3
> command.7.*=cycle_output_scroll
> command.mode.7.*=savebefore:no
>
> command.name.8.*=Cycle edge mode
> command.subsystem.8.*=3
> command.8.*=cycle_edge_mode
> command.mode.8.*=savebefore:no
>
> command.name.9.*=Set edge column width
> command.subsystem.9.*=3
> command.9.*=*set_edge_column
> command.mode.9.*=savebefore:no
Then, as you can see on the first line, I created a dedicated `.lua` file for keeping the functions, and load them at SciTE start-up.
Finally, I would like to mention that it is advisable not to forget to provide sensible defaults, for all the properties that you intend to set through the UI using one of these methods.