GIMP blending modes demo ========================
First draft: 2013-11-04
Published:   2025-11-26
Table of contents:
Publishing a piece I originally created back in 2013.
As we were talking about compositing recently, I thought it could be worthwhile to dig this out of the archives. See the end for additional background information.
Demonstration
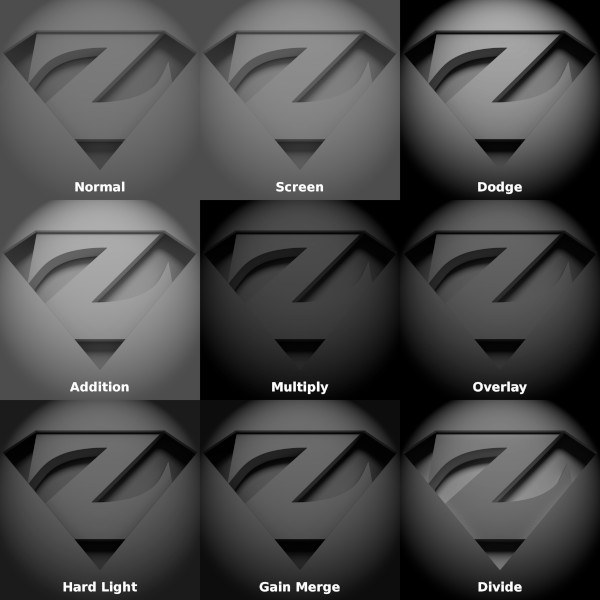
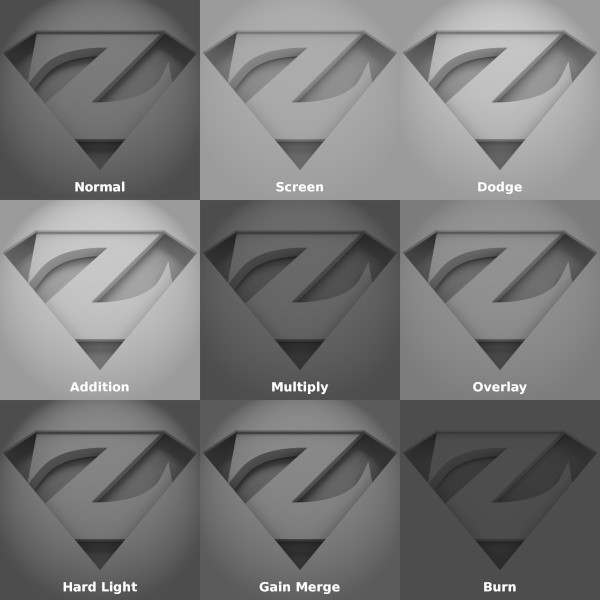
Let there be two images, in fact two renders created from the same scene, but with different light settings:
- Lamp: a point light source right above the emblem
- Sky: simulates scattered ambient daylight coming uniformly from all around


Now the thing with the lamp is too studio-like with high contrasts, and with skylight everything becomes overly homogeneous without much character, lacking the feeling that we are in a three-dimensional space. It would be much better to use the two at the same time somehow.
It turns out unfortunately - at least in my experience - that it is pretty hard to set up the two types of light sources at the same time, in the same render pass, in a way that it looks great. The goal of this demonstration is to show that if there is no change in the scene besides lighting conditions, we can still achieve a simultaneous effect by putting two separate images on top of each other and combining them.
In the operation called *compositing*, we combine two or more images by merging the colors on the same pixel coordinates. In a general sense, this can include just plain choosing the color from one of the images, thus different areas on the scene can be contributed entirely from one source. We call the procedure *blending* when we actually mix the colors together according to some mathematical function. When using two sources, we can specify which image is on top, meaning which one is blended onto the other, as many of the functions are not commutative.
In this exercise I am showing the nine most useful layer blending modes in GIMP. There are many more available, especially in recent versions, these are just my favorites that I have found to work best. It is important to note that typically we have to set the opacity of the top layer to something smaller than 100% in order for the bottom layer to have any influence. I have used 50% here for every mode. In the first set "Sky" has been blended over "Lamp", then they were swapped.
As further reading on the topic, for formal definitions on the various blending functions, see related sections of the GIMP documentation. (Note that although version 2.8 would have been relevant in 2013, there are newer versions available of the program and thus the documentation of course; but I think the old descriptions are much more descriptive compared to both versions 2.10 and 3.0, with better examples and citing the exact formulae.)
Background
This has been originally written for a good friend of mine as commentary for the pictures when I wanted to illustrate the concept of image composites. English translation of the text was done now in 2025, and I have added a few clarifications, to be clear on differentiating between compositing and blending.
The original 3D scene was created in Blender, and it is a reimagination of an older drawing of mine I was using as profile picture for a long time. I have stopped using it after realizing many others had basically the same idea - I have seen similar implementations in a few places independently (some in quite prominent places).

Last I would like to address the fact that indeed compositing can be done now right inside Blender. Probably this was true already in 2013, I cannot remember when was the node editor interface added. Nevertheless I thought GIMP was a much simpler environment to work with, especially for beginners, and in general it can be easier to use for 2D raster work, like photography. It just simply took me a decade to try demonstrating this capability with a digital camera.
Stay tuned because I might get nostalgic and publish a couple more 3D renderings of mine from the past...